This documentation is also available in: 日本語, 中文 简体, 한국어, العربية
Drops Technical Guide
IMPORTANT: This page is intended for developers. If you are looking for support on Drops as a viewer or streamer, please reach out to the game developer running the Drops campaign, and review our help article on How to Earn Drops.
Introduction
This page discusses the technical prerequisites for setting up a Drops system, and the considerations that must be made for choosing the appropriate Drops delivery mechanisms for your game. This is intended to be only a technical guide, and should be carefully reviewed before designing your system, and also consulted during the process of building the system.
Organization and Game Ownership
Before creating a Drops campaign, you must have a Developer Organization that currently has ownership of the game category you wish to create a Drops campaign for. Consult with your company to determine if such an organization already exists. If it does not, see Registering and Managing Organizations for information on how to create an organization.
If your organization does not have your game assigned to it, you will need to request ownership of the game. See Game Management for information on how to request ownership of your game category on Twitch.
You will need to wait for approval of both your organization and the game ownership request before continuing. If you have just made these requests, it may take 1-2 weeks for them to be approved. To avoid common issues with organization rejection, see Why Was My Organization Request Rejected?
Account Linking
In order to claim in-game rewards, Twitch viewers will need to link their Twitch and game accounts. Account Linking, from Twitch’s perspective, is when a user authenticates against your Application (Client ID), creating an association between the user’s Twitch account and your third-party application.
Getting your Client ID
It is required to have a Client ID, also known as an Application, owned by a user who is part of your organization. If you do not already have one, follow the steps outlined in Registering your App. It is recommended that the account that creates this Application is a shared corporate account, as Applications on Twitch cannot be transferred.
This recommendation is critical as employees may leave your organization while still owning the Application on their personal account, making it impossible for your organization to make changes to the Application.
Setting up Your Account Linking Process
When users do not have their account linked to your Application, they will be redirected to your website to complete the account linking process. In order to correctly link Twitch and game accounts, you will need to follow the following process:
- Ask viewers to log into your account system
- Ask viewers to authorize your Twitch application with their Twitch account
- Store the Twitch account <> game account mapping in your systems
Specifically, we recommend that you store the following information:
- Game Account ID
- Twitch OAuth token
- Twitch Refresh token
- Twitch User ID
While account linking can be achieved in-game, we recommend hosting a webpage to let Twitch viewers link their accounts. The URL to the page in which users will link their account can be added to your campaign configuration so that Twitch can redirect your viewers to the correct account linking page.
For information regarding authenticating your user against your Client ID, refer to the Twitch OAuth guide. The most common forms of authentication for Drops are Implicit Grant Flow and Authorization Code Grant Flow. The Client ID used in these steps must be the Client ID discussed earlier on this page, otherwise the account linking process will not work.
Handling Account De-linking
A user at any time may disconnect the account link between their Twitch account and their game account, either intentionally or unintentionally. Some examples of when this may occur are when the user:
- Changes their password
- Was suspended from Twitch
- Manually removes the connection within their account’s Connections page
- Both the OAuth token and the Refresh Token expire
- Note: The account link will not be automatically removed if only the OAuth token has expired. Both tokens must expire in this case.
In any case, it is always because the user’s authorization granted to your Client ID was revoked or removed. To check if a user has disconnected their account, you can check the validity of their OAuth token.
A user can relink their account after they de-link. We offer some recommendations to handle account relinking by users:
- In-game item grants should be 1 per Twitch User ID – Any user that has linked their Twitch account to their game account and fulfilled in-game content cannot relink the same Twitch account to a second game account and fulfill the same in-game item.
- A Twitch account should only ever get a Drop once within your game – Any user that has linked their Twitch account to their game account and fulfilled in-game content cannot relink the same Twitch account to a second game account and fulfill the same in-game item.
- Users should not be able to use multiple Twitch accounts to get duplicates of a single Drop – A user who has linked their Twitch account to their game account cannot fulfill additional in-game content by unlinking and linking another entitled Twitch account to the same game account.
- Drops should not be transferable – A user who has linked their Twitch account to their game account cannot transfer fulfilled goods to another game account (e.g. Steam marketplace, transfer content to another game account).
To handle the above cases, it is recommended you store Drop grant data associated with Twitch User IDs or in-game account IDs alongside the Campaign ID + Reward ID pairing. Keep in mind a Reward ID can be used multiple times across multiple Campaign IDs.
Removing an Account Link
You may terminate the Account Link for a user at any time, for any reason. Since the Account Links are primarily maintained by you, you will need to remove the associations within your game’s account system.
We also recommend that you revoke the OAuth access token for security reasons. There is no way to remove the appearance of the account link from the user’s perspective on their Twitch account. The user will need to manually remove the connection on Twitch if they wish to reconnect their account.
Designing Your Drops System
Twitch allows you to utilize both Twitch API and EventSub as ways to receive information about your Drops campaign. How you utilize these systems depends on the availability of your game’s inventory system from a technical perspective.
There are three recommended Drops systems you can set up:
- EventSub + Twitch API – This system allows you to receive information via EventSub about Drops entitlements directly to your own web server, and then notify Twitch using the Twitch API when these entitlements have been fulfilled. This method is most recommended for most cases, including live service games.
- Twitch API (Hosted Inventory) – This system allows you to get information about Drops entitlements upon request, but does not notify your systems automatically. This is less recommended, but can be useful in some cases where the status of a Drop should be checked upon user request.
- Twitch API (Offline Inventory) – Games where the in-game items are not hosted online, and have no access to an online server for Drops entitlement or inventory management, must have their Drops entitlement systems handled by accessing the Twitch API from within the game.
If you are unsure what to use, most cases will either be EventSub + Twitch API or Twitch API (Offline Inventory). If your entitlement delivery system is handled by a server you operate, follow the guide for EventSub + Twitch API. If your game’s entitlement system does not have access to a server, follow the guide for Twitch API (Offline Inventory).
EventSub + Twitch API
The most common Drops system utilizes both the Twitch API and EventSub. In this scenario, Drops entitlements will be pushed using EventSub Webhooks to a URL endpoint that you are hosting, which will then activate your game’s entitlement systems to deliver the item in-game. After the in-game item is successfully delivered, you will call the Twitch API to register within Twitch’s system that the reward was entitled.
Technical Details
Before the below process is activated, the user is assumed to have linked their Twitch account and game account as described in Account Linking.
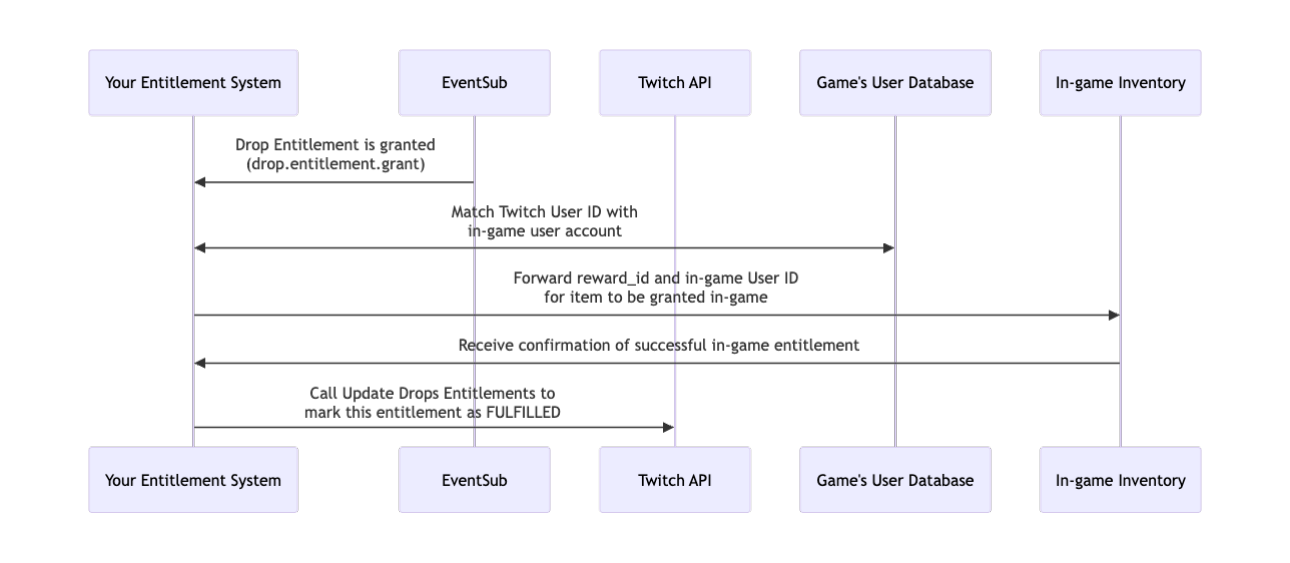
In the above diagram the following systems will be in place:
- Your Entitlement System – This is your own service that accepts an incoming EventSub Webhook, delivering a Drop Entitlement Grant EventSub payload.
- EventSub – Twitch’s EventSub product, which will deliver you Webhook notifications when a user becomes entitled to a Drop Reward.
- Twitch API – Twitch’s API, which you will call to update information about a Drop entitlement’s status.
- Game’s User Database – This is any service that allows you to find association between a Twitch User ID and your in-game account system’s identifier for a user. This association is set up during the Account Linking process.
- In-game Inventory – This is any service that allows you to grant items into an inventory system.
You will need to use an App Access Token when setting up the EventSub subscription. It is recommended to use the same App Access Token when calling the API, as this allows you to update a bulk amount of users at a single time.
EventSub Setup
Note: Before starting your implementation, first read through the Technical FAQ to review common questions and issues occurring while building a Drops system.
EventSub Subscription Type
Twitch’s EventSub product allows you to listen for real-time events you request, described as subscription types. The drop.entitlement.grant subscription type sends a notification when an entitlement for a Drop is granted to a viewer. For detailed information regarding this EventSub topic, see Drop Entitlement Grant.
To subscribe to the EventSub topic, follow the steps in Subscribe to Events. With this particular subscription type, you will need to include within your condition your organization_id, and can optionally include category_id and campaign_id. In most scenarios you only need to define the organization_id as defining the others will only deliver Drop notifications filtered by those fields.
This subscription type also requires you to include is_batching_enabled in your EventSub subscription. This is because, unlike most EventSub subscriptions, this subscription can include multiple Drop events within a single notification.
Implementation
Your entitlement system is the core of the Drops integration. This system handles incoming EventSub Webhooks, communicates with your game’s user database and inventory system, and updates the Twitch API upon completion.
As described in the chart above, your system should complete the following operations:
Accept Drop Entitlement grants
First, Twitch’s EventSub system will send you a notification whenever one or more users have completed the Drops campaign. Within the EventSub notification you will see an array with Drop data in this format:
[
    {
        "id": "bf7c8577-e3e3-4881-a78a-e9446641d45d",
        "data": {
            "organization_id": "373c8318-78e7-4bc5-bf2f-7a1a48a1d7d4",
            "category_id": "26936",
            "category_name": "Music",
            "campaign_id": "9003e09a399c-256e-11f0-8869-0a58a9feac02",
            "user_id": "141981764",
            "user_name": "TwitchDev",
            "user_login": "twitchdev",
            "entitlement_id": "WW91IGFyZW4ndCBzdXBwb3NlZCB0byBkZWNvZGUgdGhlc2UhIQ==",
            "benefit_id": "your-custom-reward-id-ends-up-here",
            "created_at": "2019-01-28T04:17:53.325Z"
        }
    },
    ...
]
Given that multiple entitlements may be returned, there may be multiple users listed in a single EventSub notification. You will need to scan through all entitlements in the payload’s array and temporarily store which entitlements are being entitled to what users.
Get user information from your database
When a user links their account, you should have a database entry somewhere that associates the link between the user’s Twitch account and their account for your game. This information will be necessary to inform the game who to entitle the Drop Reward to.
If the user is not present in your database, then the user has not yet linked their account. You will need to disregard the notification at this time and process it at a later time. You are obligated to attempt to process this entitlement for up until 14 days after the end of the campaign.
Forward information to your game to be entitled in-game
Now that you have the required information, you can forward the benefit_id and in-game user ID to your game’s backend servers. Before continuing after that, you will want to confirm with your systems that the in-game item was properly entitled to the user’s inventory.
Call the Twitch API to mark the entitlements as fulfilled
Using the Update Drops Entitlements API, you will notify Twitch that the entitlements have been fulfilled. You can call the API similar to this curl request:
curl -X PATCH 'https://api.twitch.tv/helix/entitlements/drops' \
-H 'Authorization: Bearer <Your OAuth token goes here>' \
-H 'Client-Id: <Your tokens associated Client ID goes here>' \
-H 'Content-Type: application/json' \
-d '{
    "fulfillment_status": "FULFILLED",
    "entitlement_ids": [
        "U2VyaW91c2x5LCBkb24ndCB3b3JyeSBhYm91dCBkZWNvZGluZyB0aGVzZSE=",
        "R28gcmVhZCB0aGUgVGVjaG5pY2FsIEZBUSBmb3IgbW9yZSBpbmZv"
    ]
}'
You will need to make this call using an App Access Token as this API call can affect multiple users. For more information on this API, including an example payload response, refer to Update Drops Entitlements API.
Final Thoughts
A common case that may occur is unlinked accounts. In the event that a notification occurs for an unlinked account, you will need to re-attempt the in-game item entitlement until either it is successful, or 14 days after the end of the campaign have passed.
Additionally, this implementation relies on EventSub pushing information to it, and does not check the API for missing information. While EventSub does attempt to resend failed notifications, in very rare cases the notification may not deliver. To solve for this, it is recommended to be prepared to manually search the Get Drops Entitlements API for entitlements that were never processed from CLAIMED to FULFILLED.
Twitch API (Hosted Inventory)
If you do not wish to host a web server to handle incoming EventSub Webhooks, you can instead call the Twitch API at a repeated interval. In this scenario, you will check the Twitch API at a recommended interval of 5-15 minutes, check for unfulfilled Drops for the user, and then proceed to deliver the in-game item to the user’s game account. After the in-game item is successfully delivered, you will call the Twitch API to register within Twitch’s system that the reward was entitled.
Technical Details
Before the below process is activated, the user is assumed to have linked their Twitch account and game account as described in Account Linking.
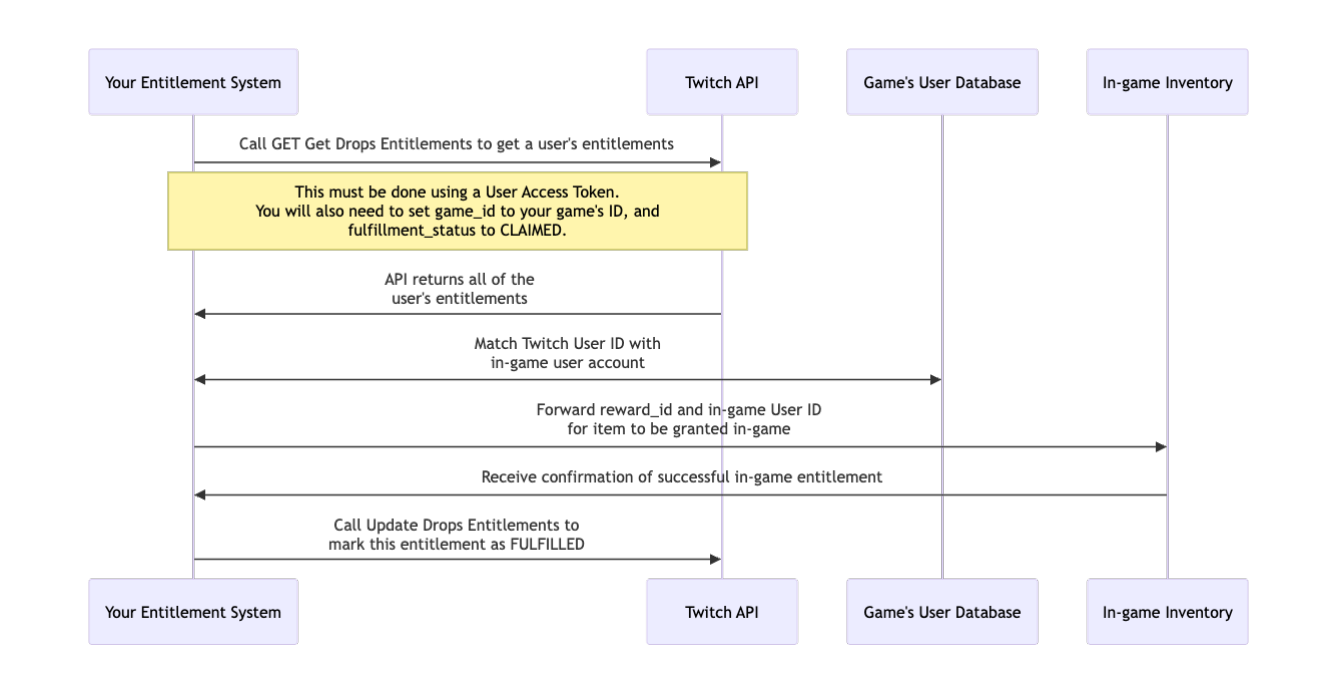
In the above diagram the following systems will be in place:
- Your Entitlement System – This is your own service that accepts an incoming EventSub Webhook, delivering a Drop Entitlement Grant EventSub payload.
- Twitch API – Twitch’s API, which you will call to get a list of Drop entitlements, and update information about a Drop entitlement’s status.
- Game’s User Database – This is any service that allows you to find association between a Twitch User ID and your in-game account system’s identifier for a user. This association is set up during the Account Linking process.
- In-game Inventory – This is any service that allows you to grant items into an inventory system.
A User Access Token is recommended for this setup, but you can utilize an App Access Token if desired. In cases where a User Access Token is utilized, you will need to call Update Drop Entitlements individually for each user using their User Access Token.
Note: Before starting your implementation, first read through the Technical FAQ to review common questions and issues occurring while building a Drops system.
Implementation
Your entitlement system is the core of the Drops integration. This system will activate at one of these moments:
- Automatically, every 5-15 minutes.
- Upon activation by another system, such as user interaction on your website.
Upon activation, the system calls the Twitch API to get a list of all unfulfilled entitlements, communicates with your game’s user database and inventory system, and updates the Twitch API upon completion.
As described in the chart above, your system should complete the following operations:
Call the Twitch API to get a list of entitlements
Using the Get Drops Entitlements API, you will get information about all unfulfilled entitlements for your game. You can call the API similar to this curl request:
curl -H GET 'https://api.twitch.tv/helix/entitlements/drops?game_id=<Your game ID>&fulfillment_status=CLAIMED' \
-H 'Authorization: Bearer <Your OAuth token goes here>' \
-H 'Client-Id: <Your tokens associated Client ID goes here>'
If you are using a User Access Token, the API will return only entitlements for that user. If you are using an App Access Token, the API will return entitlements for all users unless you otherwise specify a user_id in the query parameters.
Get user information from your database
When a user links their account, you should have a database entry somewhere that associates the link between the user’s Twitch account and their account for your game. This information will be necessary to inform the game who to entitle the Drop Reward to.
If the user is not present in your database, then the user has not yet linked their account. You will need to disregard the notification at this time and process it at a later time. You are obligated to attempt to process this entitlement for up until 14 days after the end of the campaign.
Forward information to your game to be entitled in-game
Now that you have the required information, you can forward the benefit_id and in-game user ID to your game’s backend servers. Before continuing after that, you will want to confirm with your systems that the in-game item was properly entitled to the user’s inventory.
Call the Twitch API to mark the entitlements as fulfilled
Using the Update Drops Entitlements API, you will notify Twitch that the entitlements have been fulfilled. You can call the API similar to this curl request:
curl -X PATCH 'https://api.twitch.tv/helix/entitlements/drops' \
-H 'Authorization: Bearer <Your OAuth token goes here>' \
-H 'Client-Id: <Your tokens associated Client ID goes here>' \
-H 'Content-Type: application/json' \
-d '{
    "fulfillment_status": "FULFILLED",
    "entitlement_ids": [
        "U2VyaW91c2x5LCBkb24ndCB3b3JyeSBhYm91dCBkZWNvZGluZyB0aGVzZSE=",
        "R28gcmVhZCB0aGUgVGVjaG5pY2FsIEZBUSBmb3IgbW9yZSBpbmZv"
    ]
}'
If you are using a User Access Token, the API will return an error if you attempt to modify the status of entitlements for a user not associated with the token. If you are using an App Access Token, you can use this API call to modify any entitlement associated with a game owned by an organization that the owner of the Client ID is a member of.
Final Thoughts
A common case that may occur is unlinked accounts. Entitlements from these accounts will still appear in a CLAIMED state, despite being unfulfillable until user action. If you are processing entitlements automatically, you will need to re-attempt the in-game item entitlement until either it is successful, or 14 days after the end of the campaign have passed. If you are processing upon user interaction, notify the user that they need to complete their account link before they can receive the Drop Reward.
Twitch API (Offline Inventory)
In a scenario in which there is no need for hosting the user’s inventory, such as in a single-player game, you can locally host the game.
Code Sample
To demostration an implementation of offline inventory, refer to the drops-csharp-sample repository for a C# code sample that uses device code flow (DCF). It handles user authorization, retrieves Drops entitlements, and confirms fulfillment as described in the following sections.
Account Linking
The account linking process for this scenario is slightly different, as the OAuth token will need to be locally held. Since the game is presumed to be fully offline, we will need to have a local webserver that handles the OAuth connection.
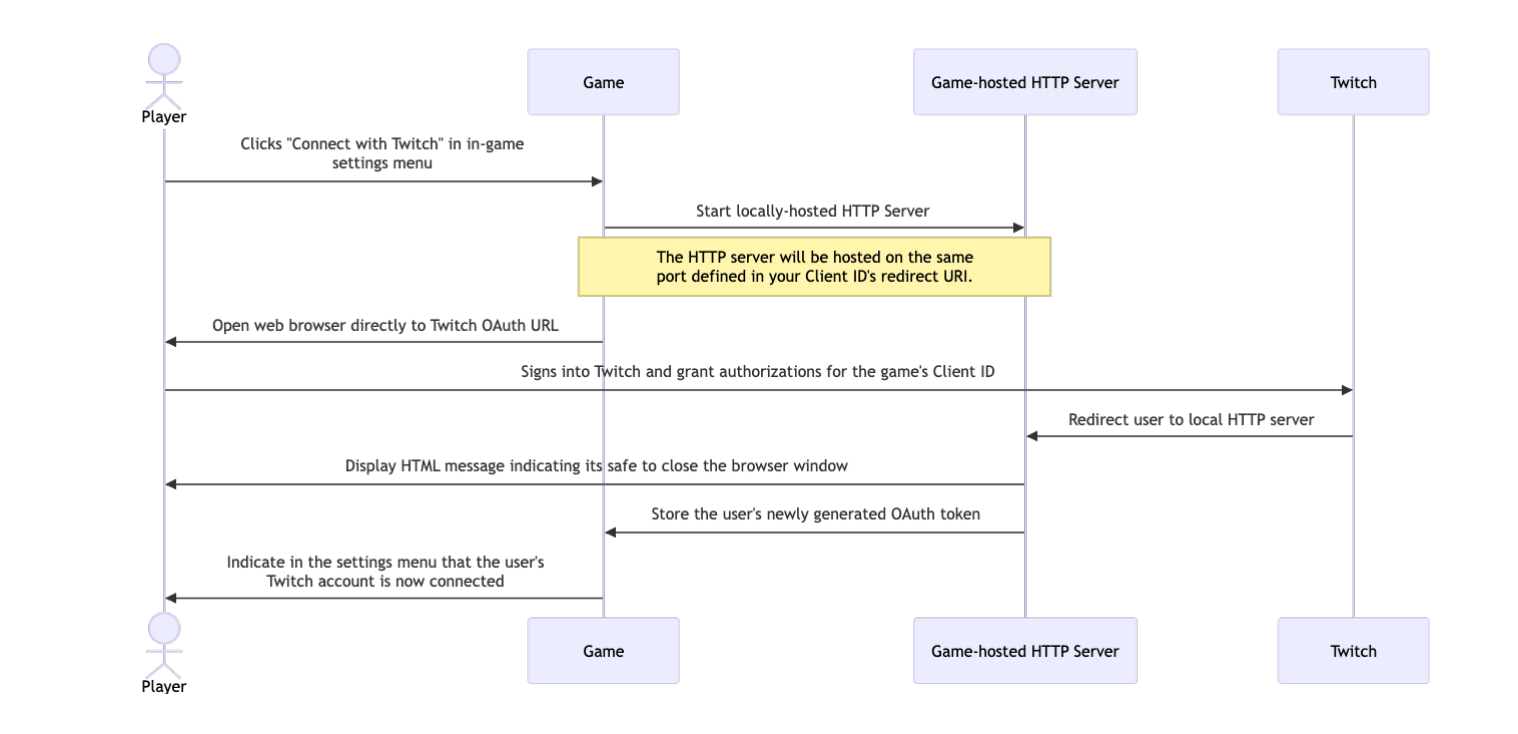
In the above diagram the following systems and entities will be in place:
- Player – This is the user who is playing your game.
- Game – This is your game, and encompasses all visual and background aspects of your game, excluding the locally-hosted HTTP server.
- Game-hosted HTTP Server – This is an HTTP server your game will start in the background. Its only use is to handle the authentication redirect.
- Twitch – Twitch, which your user will be redirected to so they can link their account to your game. The relevant parts of Twitch in this system will be Twitch’s login screen, and Twitch’s 3rd party application authorization screen.
For your user to link their account to your game, the following operations will be completed:
- The player will click the “Connect with Twitch” button within your game’s settings menu.
- In the background of your game, a locally-hosted HTTP server will start. This server will need to be hosted on the same localhost port defined in your Client ID’s redirect URI, set up during Getting Your Client ID.
- Your game will open up the player’s web browser, and automatically bring them to Twitch’s authorization URL. Because you should not under any circumstances include the Client Secret for your Client ID within your game, you will need to use the URL defined in Implicit Grant Flow.
- Once the user signs into Twitch and authorizes your application, they will be redirected to your localhost URL, with their access token included in their URL.
- Your HTTP server will accept this request, store the token locally, and return HTML to the user instructing them to close the browser window.
- Within your game, you will update the settings menu UI to indicate to the user that they have successfully connected their Twitch account.
Note: User Access Tokens are short-lived, and access tokens provided via Implicit Grant Flow do not include a refresh token. Because of this, you will need to validate your token occasionally, including during the launch of your game, and when the user initiates a check for Drops.
Technical Details
In the above diagram the following systems and entities will be in place:
- Player – This is the user who is playing your game.
- Game – This is your game, and encompasses all visual and background aspects of your game, excluding the in-game inventory systems.
- In-game Inventory – Your game’s inventory system, and any associated systems that allow you to make changes to the player’s inventory.
- Twitch API – Twitch’s API, which you will call to get a list of Drop entitlements, and update information about a Drop entitlement’s status.
Implementation
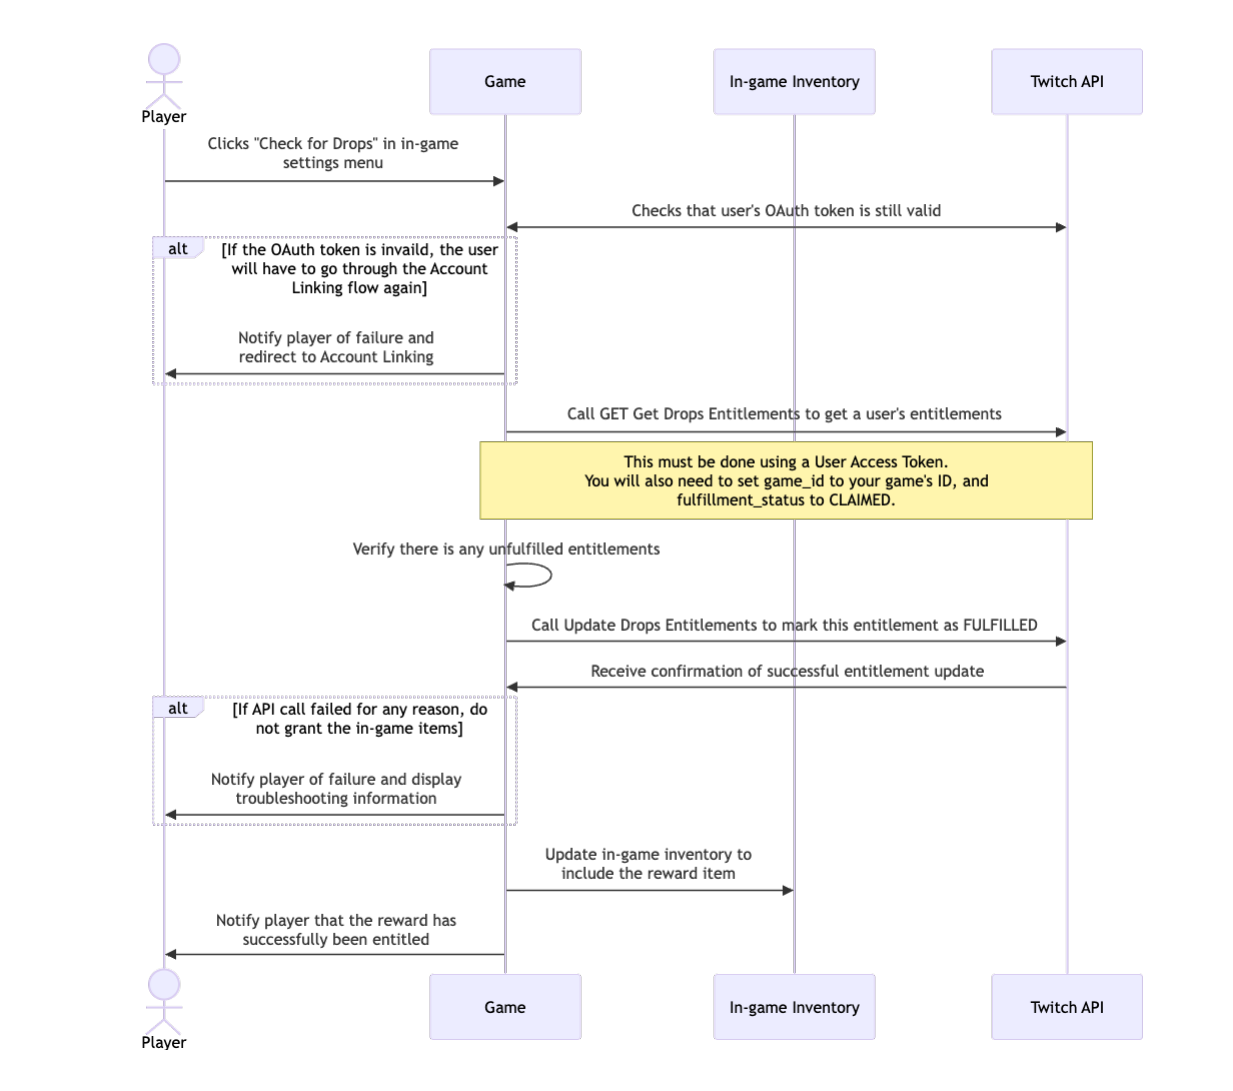
This system starts when a user manually initiates a request to check for unfulfilled Drop Rewards. These requests will generally be within a Check for Drops button from your in-game settings UI. Upon activation, the system validates the locally stored OAuth token, calls the Twitch API to get a list of all unfulfilled entitlements, communicates with your game’s inventory system, and updates the Twitch API upon completion.
As described in the chart above, your system should complete the following operations:
Validate the stored OAuth token
User Access Tokens are short-lived, and access tokens provided via Implicit Grant Flow do not include a refresh token. Because of this, you will need to validate your token before you call the Twitch API. Alternatively, you can attempt to make the API call and it will return an HTTP 401 Unauthorized if the token is expired.
If the token is expired, you will need to direct the user to relink their account via the Connect with Twitch button.
Call the Twitch API to get a list of entitlements
Using the Get Drops Entitlements API, you will get information about all unfulfilled entitlements for your game. You can call the API similar to this curl request:
curl -H GET 'https://api.twitch.tv/helix/entitlements/drops?game_id=<Your game ID>&fulfillment_status=CLAIMED' \
-H 'Authorization: Bearer <Your OAuth token goes here>' \
-H 'Client-Id: <Your tokens associated Client ID goes here>'
This call must be made using the User Access Token discussed earlier. It will automatically return information only for the user playing your game.
Verify there are any unfulfilled entitlements
In this system, the user can initiate a check for Drops entitlements at any time. Because of that there may not be any Drop entitlements to fulfill. Process through the API response and verify there are entitlements that need to be fulfilled before continuing.
Call the Twitch API to mark the entitlements as fulfilled
Using the Update Drops Entitlements API, you will notify Twitch that the entitlements have been fulfilled. You can call the API similar to this curl request:
curl -X PATCH 'https://api.twitch.tv/helix/entitlements/drops' \
-H 'Authorization: Bearer <Your OAuth token goes here>' \
-H 'Client-Id: <Your tokens associated Client ID goes here>' \
-H 'Content-Type: application/json' \
-d '{
    "fulfillment_status": "FULFILLED",
    "entitlement_ids": [
        "U2VyaW91c2x5LCBkb24ndCB3b3JyeSBhYm91dCBkZWNvZGluZyB0aGVzZSE=",
        "R28gcmVhZCB0aGUgVGVjaG5pY2FsIEZBUSBmb3IgbW9yZSBpbmZv"
    ]
}'
This can be performed before or after entitling the item in-game, but performing it before entitling it in-game may avoid some race conditions with your inventory system. The purpose of this call is to prevent the user from claiming the in-game item multiple times.
If the API call fails for any reason, such as an expired token or lack of an internet connection, you’ll need to notify the player of this failure and provide them with appropriate troubleshooting instructions.
Update your in-game inventory to include the reward item
Since this system operates entirely within your game, you can now call your game’s inventory to update it to include the reward item associated with the entitlement.
Notify the player that the reward has been successfully entitled.
The player can now be redirected back to your game to enjoy the in-game item they have received!
Technical FAQ
How long do I need to support fulfilling a Drop claim for a user?
Developers are required to fulfill viewer rewards that claim and link their account up to 14 days after the campaign ends. For certain time sensitive campaigns, such as a limited time beta, this requirement may be waived.
Can claims occur after the campaign ends?
Yes. Users must meet the requirements to earn a Drop during the time period of the campaign, but for up to 14 days after the campaign ends the user is able to link their account and claim. When this occurs, you may receive an EventSub notification, and the data provided by the Twitch API will be updated.
Is there a maximum length for IDs provided by EventSub and Twitch API?
There is no imposed maximum length for IDs, as IDs are opaque and subject to change. If a maximum expected length is expected by your database, it is recommended to use 255 to allow for flexibility.
Should I validate the format of, or decode, Reward IDs?
No. IDs related to Drops that are provided by the Twitch API and EventSub are opaque, and provide meaningless information if decoded. The format of IDs are also subject to change at any time, so do not validate IDs based on an expectation of format (such as GUID or Base64).
Can claims happen before an account is linked?
Yes, users are able to claim Drop Rewards before linking their account. In these cases, you will be expected to check for the user to link their account until they do. This is only required for up to 14 days after the end of the campaign, as users can no longer claim rewards after that point.
Do I need to mark Drops entitlements as FULFILLED?
Yes. There is no way other of retrospectively knowing that a Drop entitlement was successfully fulfilled except by marking it as such via the Twitch API. It is useful to do so even in systems utilizing EventSub as there can be rare cases where your EventSub system is down during a campaign period and misses a new Drop entitlement.
Is there an order to how API results are returned?
No. The Get Drops Entitlement API has no expected order in the results returned, and may return results in an order irrelevant to any of its properties. To better search for entitlements with specific properties, such as fulfillment status, utilize the query parameters when calling the API.
Why does a user not show an account link after attempting to link their account?
Successful account linking for a Drops campaign is determined by the user successfully authenticating against the Client ID attached to your game, set within Drops Settings. Ensure that the Client ID set within Drops Settings is set to the same Client ID as the “Connect to Twitch” link you set up in the Account Linking section earlier.
Note: If you change your game’s Client ID in Drops Settings after creating the Drops campaign, you will need to create a new campaign to sync it with the game’s newly assigned Client ID.