This documentation is also available in: 日本語, 中文 简体, 한국어, العربية
Drops Campaign Guide
IMPORTANT: This page is intended for developers. If you are looking for support on Drops as a viewer or streamer, please reach out to the game developer running the Drops campaign, and review our help article on How to Earn Drops.
Introduction
This page discusses how to set up a Drops campaign, including creating a reward, testing the campaign, and making it available for all users to participate in. Except in the case for technical testing, campaigns should only be created after the Technical Guide has been completed, and your game is fully capable of Account Linking and granting in-game entitlements.
Before creating a campaign, you should plan your campaign’s event period, what rewards are provided, and how those will be presented. Refer to Overview for information on creating successful campaigns.
Glossary
| Term | Definition | Example |
|---|---|---|
| Drops Campaign | A collection of Drops that are distributed during a specified time period. Drops within a campaign can only be earned between the campaign’s start and end dates. | “Super Soccer 2025 Launch” |
| Drop | A collection of rewards distributed to viewers based on a Drop rule during the campaign time period. | Limited Edition Soccer Balls |
| Drop Rule (also referred to as “milestone” and “requirement”) | The conditions viewers must meet on participating channels in order to earn a Drop. | Watch for 60 minutes |
| Reward | An in-game item that is granted by a Drops campaign owner to viewers who are entitled to it. Typically, these are either in-game items or beta-access keys. | “Ultimate Ball” |
| Benefit | Benefit and Reward are interchangeable terms. Rewards are created in the Rewards Managed, and are surfaced as “Benefits” in the API and EventSub. | “398dnb-9kdlsnm-dasdfk2-doandbo3-onbm21“The above Benefit ID is the Reward ID of “Ultimate Ball”. |
| Entitlement | A Twitch-provided record of a viewer earning a specific Drop (and the reward it contains) | “fb78259e-fb81-4d1b-8333-34a06ffc24c0” |
| Campaign Status | Campaigns can be set to one of these six states:Disabled - The campaign is not visible on Twitch. Any fields within the campaign can still be edited.Test - The campaign is visible to Test viewers. Any fields within the campaign can still be edited.Upcoming - The campaign is enabled but the start time has not occurred yet.Live - The campaign is enabled and the present time is between the start and end time.Expired - The campaign is removed from Twitch because the campaign end time has elapsed.Expired Manually - The campaign is removed from Twitch because a campaign owner canceled it before its scheduled end. |
      |
Setting up for a Game’s First Campaign
If you are creating a Drops campaign for a game that your organization has not previously run a campaign for, you are first required to configure the game within Drops Settings. If this is not the case, you can skip ahead to Creating a Reward.
First, click the Drops tab, visible on the left side of the Developer Console of your organization.
Then, look for and click the Drops Settings button, which can be found towards the top-left of the page.

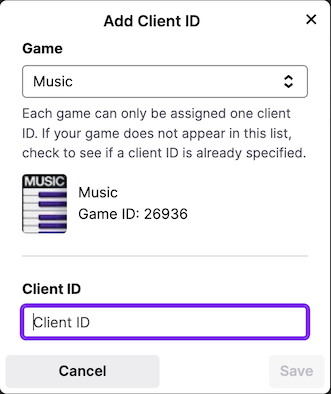
Click the Add Client ID button, select your game, and enter the Client ID associated with your Account Linking system. If you do not know your Client ID, it will be the one used earlier in the Login with Twitch redirect.
Creating a Reward
Before creating Drops Campaigns, you can use the Rewards Manager to set up the rewards you will associate with Drops that will be granted to Twitch viewers. Alternatively, you can add rewards while creating Drops within a campaign. When you create rewards via the Drops management interface, they will also be placed within the Rewards Manager.
Rewards can be reused across multiple Drops and multiple Campaigns. If you haven’t already created a reward, you will need to create a new one.
To create a reward, select the Rewards Manager within the Drops page of your organization’s Developer Console.

Then, click the Create New Reward button to fill out the details of the item you will award viewers who complete the Drops conditions. At this time do not worry about the Drops conditions, these will be set later within a Drops Campaign. You will be prompted to fill out the following information about the Reward:
| Field Name | Details and Usage | Example |
|---|---|---|
| Reward Image | This image will display within the notification callout when a Drop campaign is enabled, on the streamer dashboard, and within the inventory card UI when a viewer earns the reward. It must be 160x160px, JPG or PNG format, and less than 1 MB in size. |
 |
| Reward Name | The name of the reward. | Ultimate Ball |
| Game | The game this reward is associated with. Games in this list must be owned by the organization, and must have a Client ID mapped to within Drops Settings. | Super Soccer 2025 |
| Reward Connection URL | The URL viewers will access to link their Twitch account with your game’s identity service. Viewers expect that this identity link will provide the access needed to have the reward delivered to them after earning it on Twitch. This link should be the portion of your website that handles Account Linking, or a link to an article explaining how to set up the account linking within your game. |
https://supersoccer2025.gaming/account-link |
| iOS Based Reward | If this reward is associated with an item that can be used within an iOS app or game, this field must be toggled to ON. This will hide the Drops campaign on iOS devices. However, viewers’ progress on iOS will still be tracked and they would be able to claim the reward on other platforms. |
OFF |
| Reward ID (optional) | You can specify a unique ID for this reward in case your game’s fulfillment service expects a certain identifier for the item granted. If you do not specify an ID, we will generate a GUID upon saving the reward on Twitch. Note: Reward IDs must be unique, and multiple rewards with the same Reward ID cannot be made. |
your-custom-reward-id |
After providing these details, saving the reward will make it available to any Drops added to a Drops campaign.
All Reward details can be modified after creating the Reward, except for the Reward ID. If the Reward ID needs to be changed, you will need to create a new Reward.
Creating a Campaign
To run a Drop on Twitch, you will first need to set up a Drops Campaign, which allows you to schedule several Drops in advance of the event you’ll host for the Twitch community. Prior to launch, campaign information will be displayed for creators, so they can ensure their streaming schedules align with your event. You can run up to 10 Drops during a campaign.
Within your organization’s Developer Console, access the Drops page, and then click Create Drops Campaign. This button can be found towards the top-right side of the page. It will then request you to add the following information to your campaign, which will be displayed for creators before, during, and after your campaign:
| Field Name | Details and Usage | Example |
|---|---|---|
| Campaign Image | This image will be displayed for both viewers and creators before, during, and after your campaign. It should visually summarize the event relating to the Drops campaign. It must be 160x160px, JPG or PNG format, and less than 1 MB in size. |
 |
| Campaign Name | This brief description gives streamers and viewers an overview of the campaign event. It can be no longer than 25 characters. | “Super Soccer 2025 Launch” |
| Start Date & Time, End Date & Time | The duration of the campaign event, in which Drop Rules will be active for all Drops added to the campaign. Campaigns have a 28-day maximum duration Times are entered in UTC, so that should be accounted for when setting timeframes. |
October 10th 2025 12:00PM (UTC) to November 10th 2025 12:00PM (UTC) |
| Game | The game category creators must stream in order for Drops to be present on their channel. When a creator goes live during the campaign timeframe, viewers who visit the channel will have the ability to earn the Drops set up within the campaign. | Super Soccer 2025 |
| Drops Connection URL | The URL viewers will access to link their Twitch account with your game’s identity service. Viewers expect that this identity link will provide the access needed to have the reward delivered to them after earning it on Twitch. This link should be the portion of your website that handles Account Linking, or a link to an article explaining how to set up the account linking within your game. |
https://supersoccer2025.gaming/account-link |
| Drops Detail URL | You can set up a marketing page to provide viewers and streamers more information about the campaign event, the rewards that they could earn, and the conditions required to earn the rewards. While setting up a marketing page is optional, it is highly recommended. If you do not set up such a page, this URL can be your game’s homepage. |
https://supersoccer2025.gaming/blog/twitch-drops-launch |
| Description | This description is visible on the Drops page within the creator’s dashboard. It should cover all of the details of the campaign to entice creators to play your game during the campaign time period. | Super Soccer 2025 is an arcade style soccer game that lets you play as the game’s legends at the world’s greatest stages… or at the public park. During October, we’ll be giving away exclusive balls that unlock certain capabilities within the game, exclusive to our fans on Twitch. See you on the field! |
Once you create the campaign, you’ll be taken to the Campaign Details page where you can see a preview of how your campaign information and rewards will be presented to creators and viewers before, during, and after the campaign.
Next, you will set up the Drops that will be distributed to viewers during the campaign. You can add up to seven Drops, all of which will be able to be earned immediately at the start of the campaign. There are two types of Drops requirements you may set:
- Time-Based Drops – Also known as “Watch Time” Drops, viewers can earn the rewards within the Drop if they watch streams with Drops enabled during the Drop time period. All time-based drops begin earning Drops
- Subscription-Based Drops – Also known as “Gifts & Subs” Drops, viewers can earn the rewards within the Drop if they subscribe to or gift subscriptions in a channel where Drops are enabled during the Drop time period.
Time-Based Drops
Time-Based Drops, shown on the Developer Console as the “Watch Time” requirement type, distribute rewards when viewers have watched a creator stream your game for a specified amount of time. Twitch monitors the amount of time viewers spend across all channels streaming your game, so all you have to do is fulfill the rewards they are entitled to.
To add a time-based Drop to your campaign:
- Within your campaign, click on the Drops tab. This is found directly below your campaign’s name in the left-center of your screen.
- Click the Create New Drop button.
- Specify a name for the Drop, and make sure Watch Time is selected for the Requirement Type.
- Set the Watch Time requirement duration using the dropdown menu (ranging in increments from 15 minutes to 15 hours).
- Click the Create Drop button.
Note: All Drops created will increase their accrued Watch Time simultaneously. If your campaign includes more than one Drop and you want viewers to earn each Drop at different lengths of time, you’ll have to configure the times accordingly. For example, if you have three drops within your campaign and want each to be earned 30 minutes after one another, set the first Drop for 30 minutes, the second Drop for 60 minutes, and the last Drop for 90 minutes.
For best practices on setting the most engaging and rewarding Watch Time lengths, refer to Running a Successful Drops Campaign.
Subscription-Based Drops
Subscription-Based Drops distribute rewards when viewers have subscribed to or gifted subscriptions in a channel to meet your subscription count requirement. Twitch monitors the subscriptions across all channels streaming your game, so all you have to do is fulfill the rewards they are entitled to.
To add a subscription-based Drop to your campaign:
- Within your campaign, click on the Drops tab. This is found directly below your campaign’s name in the left-center of your screen.
- Click the Create New Drop button.
- Specify a name for the Drop, and make sure Gifts & Subs is selected for the Requirement Type.
- Set the Subscription Count requirement using the dropdown menu (ranging from 1 to 5).
- Click the Create Drop button.
For best practices on setting the more engaging and rewarding Subscription requirements, refer to Running a Successful Drops Campaign.
Add Rewards
After creating your Drop, you now need to add the Rewards to distribute when the condition has been met. Rewards are the items you will distribute to viewers after they have completed a Drop’s watch time or subscription count requirements. You can add up to 10 rewards to a Drop, all of which will be rewarded upon completion of the rule.
Rewards are first created in the Reward Manager, and then added to a Drop:
- Within your campaign, click on the Drops tab.
- Identify which Drop you’d like to add a Reward to.
- On the right side of the Drop, click the + button for that Drop.
- Select the Reward you wish to include within the Drop.
Rewards cannot be reused within the same Drop, however they can be used in multiple Drops across the same campaign.
Testing your Campaign
Once your campaign is fully set up, you can begin testing. We strongly encourage testing any Drop before you activate it as part of a Drops Campaign. To make sure your event is kept a surprise to the community, you can use two access lists to limit the number of accounts who can preview the Drop before it goes live to all viewers and creators.
Note: If your campaign contains both Timed-Based and Subscription-Based Drops, we recommend only testing the Timed-Based Drops. Currently, testing with Subscription-Based Drops currently requires using real Twitch subscriptions, which may be inconvenient for testing purposes. Testing your Drops campaign is never a requirement, just a recommendation.
Testing is performed in the following process:
1. Specify Test Viewers and Creator Access
Click on the Access tab within a campaign and you will see two sections: Test Viewers and Creator Campaign Access. Test Viewers can participate in Drops campaigns when the campaign status is in the Test state. To specify test viewer(s), input their username(s) within the Test Accounts textbox.
2. Change the status of your campaign to Test
In the top-right corner of your campaign page, you’ll see a Change Status button. Clicking this allows you to change the state of your campaign between Disabled and Test. Change this state to Test and click Change Status again.
3. Link a test viewer account
Using one the accounts set in Test Viewers, test your account linking flow by clicking the link for Connect button present on your campaign that is now visible on the Drops & Rewards page of Twitch. Upon success, or if the account is already connected, the button will no longer be visible and instead will have a pill displaying CONNECTED in its place.
4. Stream on a Twitch streamer account
Start streaming on Twitch using an account that is part of your developer organization. Ensure that (1) the category is set to your game, (2) within the accounts creator dashboard Drops are enabled, and (3) your Drops campaign’s status is set to Test.
5. Complete the Drop requirement with a test viewer
Complete either the watch time or subscription count requirement to earn the Drop. At this time, there is no way to simulate a subscription to test the implementation, and instead it will require gifting or subscribing with a paid subscription.
6. Claim the Drop within your inventory
From the test viewer account, access your Drops Inventory and click Claim Now on your Drop.
7. Verify your Reward has been granted
Wherever the Reward is granted, usually within your in-game inventory, verify that the Reward or Rewards have been granted.
Launching your Campaign
Once you have added the Drops to the campaign and tested them within your organization, you are almost ready to go live! Before we going live, you should go through a pre-launch checklist:
- Verify that your Drops are properly being entitled to linked users within your game. See Testing Your Campaign for more information on verifying this.
- Ensure your campaign start and end times are set correctly. Times are set in UTC, so if you are not in this timezone is it very easy to accidentally misconfigure this setting. These dates and times cannot be changed after the present date and time have passed the specified start date.
- Ensure your campaign’s URLs are set correctly. URL typos can happen, and these links are vital for directing users to successfully participating in your campaign.
- Verify your Drop Rules are set properly. These cannot be changed after the campaign starts, so they should be checked over before the campaign starts.
After the checklist is completed, you can launch your campaign by clicking Change Status and selecting the Enabled state. You will see a preview sheet of the campaign, which you can use to again validate any misconfigured settings or typos within your campaign’s details and Drops.
Once you have set the status to Enabled, you will see one of the three states:
| Status | Visibility | Campaign Edit Restrictions |
|---|---|---|
Upcoming: The start time is in the future. |
Creators will be able to view the campaign details in the creator dashboard. | Campaign details can be changed. The start date can be moved up to the present. |
Live: The start time is in the past and the end time is in the future. |
Creators will be able to view the campaign details in the creator dashboard and on the Drops & Rewards page. Viewers will see the game has Drops Enabled in the Twitch directory. Channels streaming the game live will show the Drops Enabled tag. Viewers following streamers that go live with your game that has a campaign enabled will receive a notification encouraging them to tune in. |
The campaign can no longer move to a disabled or testing state. Only changes to metadata such as campaign/reward names, URLs, descriptions or the allowlist can be made in this state. Changes to Drops or Drop Rules are not possible. |
Expired: The end time is in the past. |
The campaign will be hidden from all views. If a user has earned or claimed a Reward, it will remain within their Drops Inventory for 6 months. | No changes can be made to any campaign or drop details. |
If you need to terminate the campaign while it is Live, you may change the status to Expired Manually by clicking Expire Campaign. The campaign cannot be restarted after this is done.
Viewing Analytics about your Campaign
A downloadable report for some data regarding your campaign is available 48 hours after the campaign starts. You can download this report by clicking the Analytics tab within your campaign’s dashboard.
This report is delivered in CSV format and contains total daily information about various metrics, with some information also split by individual Drop. Information included in this report includes:
- Cumulative Unique Streamers Participated (not split by individual Drop)
- Cumulative Unique Users Participated (not split by individual Drop)
- Cumulative Unique Users Earned Drops
- Cumulative Unique Users Claimed Drops
- Cumulative Unique Users Claimed Drops with Account Linked
- Unique Streamers Participated (not split by individual Drop)
- Unique Users Participated (not split by individual Drop)
- Unique Users Earned Drops
- Unique Users Claimed Drops
- Unique Users Claimed Drops with Account linked
Cumulative data is calculated based on data from previous days, whereas non-cumulative data is unique to its own day. As such, unique users who participate in both Day 1 and Day 2 of a campaign will not be counted twice in cumulative data, but the numbers from Day 1 will be rolled into Day 2.
An example of this CSV can be downloaded here.
Note: Users can claim Drops before linking their accounts. Because of this, Cumulative Unique Users Claimed Drops with Account Linked will most closely represent what you will see entitled within your game. However, users can claim Drops up to 14 days after the campaign ends, and analytic data is not generated after the Campaign’s event period. For the most accurate results of total entitlements, please refer to data stored within your entitlement system.
Considerations
There are some considerations that should be taken into account when setting up your campaign.
Overlapping Campaign Restrictions
You may only have a single category-wide campaign running for any given game category within a specific time period. The campaign will not be able to be toggled to Live if its campaign period overlaps with another campaign already set to Live.
This restriction does not apply to campaigns that are allowlisted to specific creators. You may create up to 7 overlapping allowlisted campaigns for a given category.
Overlapping Campaign Behavioral Considerations
When multiple campaigns for your category are running simultaneously, progress towards a campaign will be awarded to every campaign currently live on a given channel. For example, if Campaign 1 and Campaign 2 are running on a channel, 1 minute of watchtime will be awarded to both campaigns. In the case of Subscription-Based Drops, subscriptions used on the channel will also count towards both campaigns.
Campaign Allowlist Restrictions
A campaign’s streamer allowlist, modified in the Developer Console under “Creator Campaign Access”, is only supported for up to 1000 creators. There are no plans to expand support beyond this limitation.
Review Best Practices and FAQ
We recommend reviewing the earlier Running a Successful Drops Campaign and FAQ, which contain information helpful to building the most successful campaigns, and what to expect for common user issues and complaints.