Extensions Monetization Guide
Reviews for chatbot verification continue to be temporarily paused while we revise our processes. Reviews for Extensions, developer organizations, and game ownership have resumed. Thank you for your patience and understanding.
As of July 9th 2024, there is no longer a requirement to have an Apple Developer account, or fill out the "iOS Allowlist Request" form, to allow an Extension to work on the iOS version of the Twitch app. All mobile Extensions, existing and new, are available on iOS and Android without additional requirements in the submission process.
Introduction
There are two ways to monetize an Extension:
- Bits in Extensions enables developers to offer viewers specific actions and products in exchange for a Bits. Once a broadcaster activates a Bits-enabled Extension on a stream, viewers can perform an action or purchase a product within the Extension, provided the viewer’s account contains enough Bits. If it does not, the Extension can help the viewer buy more Bits by taking the viewer to a separate, external system, that handles Bits purchases.
Revenue from Bits used in an Extension is shared between the broadcaster and the Extension developer.
- Subscription status support allows an Extension to view a user’s subscription status (not subscribed, tier 1, tier 2, or tier 3) for the current channel. In this way, developers can tailor the features they offer to the viewer’s status.
Before you can monetize your Extension, you must enable and configure monetization, as described in the next two sections.
Enabling Monetization
Overview
Enabling monetization (onboarding) allows you to create products to use in your Extension. During monetization onboarding, we require your tax and financial information, so we can validate your identity and pay out any revenue you earn.
Notes:
- Fill out the onboarding form carefully. To change information later, you must resubmit the form.
- This procedure is for Extensions developers, but it is done through your broadcaster dashboard rather than the developer console.
- Onboarding is only for developers who are not Twitch partners or affiliates. If you are a Twitch partner or affiliate, you do not need to onboard.
Process
On the Monetization tab of the Extensions Manager, click Continue to Onboarding. Follow the steps on the page to go to the onboarding form. Be sure to complete all sections of the form.
- Register as a developer
- Complete the fields with information about the legal entity that owns the extension. This information must exactly match your tax information and financial information, so make sure it is correct.
- Each legal entity can have only one Extensions developer account. If you have multiple individuals under one legal entity, please do not complete the onboarding multiple times; instead, have all your users utilize your onboarded Twitch account.
- Agree to the Twitch Extensions Developer Agreement
- If you are under 18, this section asks your parent or legal guardian to agree to the agreement on your behalf. Your parent or legal guardian must enter their full legal name, check the box, and click Agree.
- For help interpreting the contract, please contact your attorney.
- Complete two tax interviews for royalty tax and service tax. The two forms are very similar but used for different purposes. Both need to be filled out accurately.
- Since Twitch is a subsidiary of Amazon, we use some Amazon tools to help Extensions developers get registered, including the tax-information forms.
- For definitions of individual fields, see the Amazon Tax Information Interview Guide.
- For help with this section, please contact your tax professional.
- Provide financial information to finish the process of validating your identity, enabling you to participate in available monetization features, and to choose a method of payment.
- On the Payment Method screen, we recommend you select Hold My Payments. You can modify this selection later.
- Provide the requested personal financial information so we can validate your identity.
- This section may ask you for additional information. If you get this prompt, please submit a scanned copy of a government ID, such as a passport.
After you provide all requested financial information, the approval process will begin. It can take up to two business days. If you are approved, you will receive a notification email. If not, information is provided in Extensions Monetization Developer Onboarding on your broadcaster dashboard. Check there if you don’t get approval email within two business days.
Changing Information After Onboarding
Changing onboarding information is done through your broadcaster dashboard, under Extensions Monetization Developer Onboarding.
To change your payment method, select Change Payment Method.
To change other information, on the Extensions Monetization Developer Onboarding main menu, click Start Over. This clears any information you have in our system, so you must complete the entire onboarding process again.
Extension Monetization in Organizations
For Extensions managed by an organization, you will need to follow a modified set of steps to enable Bits and Subscriptions features. To learn more, see Organizations.
Configuring Monetization
All broadcasters can install and activate Bits-enabled Extensions. However, Bits features will not succeed on channels that cannot accept Bits. We recommend that you build experiences that account for both eligible and ineligible channels.
Overview
Extensions that use Bits-in-Extensions features can be installed by all broadcasters, regardless of their ability to receive Bits on their channels. Check the twitch.ext.features.isBitsEnabled feature flag to determine if Bits-in-Extensions features will work in your Extension on the current channel.
Note: It is mandatory to check for that flag for any monetized Extensions.
This flag will be false if:
- You did not enable Bits support in the Monetization tab in the Extensions manager.
- The broadcaster is not eligible to receive Bits.
- The broadcaster disabled Bits-in-Extensions features for your Extension.
If this flag is false, you should disable or hide the Bits-in-Extensions features in your Extension. We recommend that you build experiences that account for both eligible and ineligible channels.
Process
- Go to the Extensions developer console: log in to the Twitch developer site with your Twitch ID, click Your Console (top right), then click the Extensions tab.
- Go to the Extensions manager: find the Extension/version you want to configure and click Manage.
- Click the Monetization tab.
- If you are a Twitch partner/affiliate, proceed to Step 5. If not, click Continue to Onboarding. The other fields on the page are not selectable until you complete onboarding. After you complete onboarding, proceed to Step 5.
- Select one or more monetization options:
- Under Bits Support, select Bits enabled to enable your extension to offer Bits-enabled products.
- Under Subscription Support, select Subscriber support enabled to enable your Extension to get a viewer’s subscription status.
- Manage the Bits Product Catalog (see next section). If you enable Bits, you can manage your product catalog inside the Twitch Developer Console.
Managing the Bits Product Catalog
Introduction
To manage your Bits products, navigate to the Twitch Developer Console. Click on any Extension you have already created, navigate to the “Monetization” tab, and if you have already enabled Bits Support, you will see a “Bits Products” section as well. Here, you can view, create, edit, and deprecate products as long as your Extension is enabled and configured for Bits and you are logged into the account that owns your Extension.
If you try to redeem Bits for a product in an Extension which, on your own channel, is in a local or hosted testing state, it will succeed without using your Bits.
Creating a Bits Product
To create a Bits product and add it to the catalog:
- Click Add Product. This adds an unsaved new product to the list of your products. Refreshing the page will delete all unsaved changes.
- Set the catalog fields as desired. All fields are required.
- Click Save All, to save the new product to your catalog. Once you save a product, you cannot delete it or change its SKU.
A catalog can contain at most 250 products. You can deprecate products.
Editing a Bits Product
To edit a product:
- Change fields as desired (see descriptions below). All fields are required. While you are editing, the purple dot on the right indicates a product was edited.
- Click Save All, to save all edited and new products.
Deleting, Deprecating, and Restoring a Bits Product
You cannot delete a product.
You can deprecate a product, so it no longer shows up for end users. Deprecated products are not included in the products returned by getProducts.
To deprecate a product:
- Click Deprecate next to the product.
- Click Save All.
To restore a deprecated product:
- Click Restore next to the product.
- Click Save All.
Bits Catalog Fields
Here are the catalog fields:
| Field Name | Description |
|---|---|
| Product Name | Name of your product, to be displayed in your Extension. The maximum length is 255 characters. |
| SKU | SKU of your product. This must be unique across all your products. It cannot contain white space. The maximum length is 255 characters. The SKU cannot be changed after saving. |
| Amount (in Bits) | Number of Bits for which your product will be exchanged. Valid values: 1 - 10000. |
| In Development | Toggles whether your product is “in development” and hence not included in the products returned by getProducts in production. Default: Yes. |
| Broadcast | Toggles which Extension instances execute the onTransactionComplete callback. For more information, see the table near the end of If the Viewer is Logged In. |
Notes on Bits in Extensions
Extension Initialization
Normally, an Extension does bootstrapping or initialization operations in the onAuthorized callback. For Bits-in-Extensions purchases, getProducts also must be called to get Bits products.
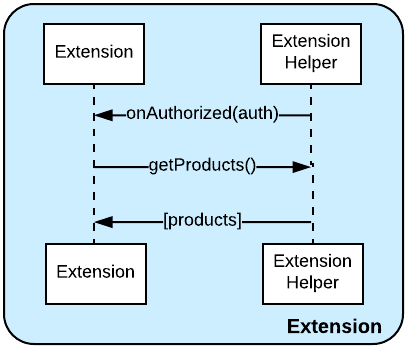
Getting Bits-in-Extensions Products
The number of Bits necessary to exchange for a product is a flat rate, regardless of the viewer’s geographical location. To display the amount to the viewer, the Extension helper for Bits-in-Extensions uses the getProducts function. You call getProducts as part of your Extension’s initialization process, to get the correct list of products that you will display on your Extension’s storefront. This helper method returns a promise, which you can use as follows:
Twitch.ext.bits.getProducts().then(function(products) {
   console.log(products); // [ { sku: 'abc123', cost: { type: 'bits', amount: '10' } } ]
});
For details, see getProducts in the section on Bits-in-Extension helper methods in the Extensions Reference.
Exchanging Bits for a Product
When a viewer wants to use Bits within an Extension, you call the useBits function on the Extension helper. This function takes in the SKU of the product the viewer wants to exchange. The function is invoked as follows:
let productSku = 'abc123';
Twitch.ext.bits.useBits(productSku);
If the Viewer is Logged In
When useBits is invoked, if the viewer is logged in, the Twitch UI displays a dialog, showing:
- The current amount (in Bits) necessary to exchange for the product, even if it does not match what was displayed in the Extension. (The Bits amount could have changed since the Extension loaded the list of products in the user’s browser.)
- Whether there are enough Bits in the viewer’s account to exchange for the product:
| If … | Then … |
|---|---|
| There are enough Bits in the account. | A Confirm button is displayed. The dialog shows what the remaining Bits balance will be after the transaction is completed. It also informs users that clicking on the button will share their identity with your Extension. |
| There are not enough Bits in the account. | No Confirm button is displayed. The dialog shows how many more Bits are needed to confirm the transaction. |
- An option to buy more Bits (in a separate system). If a user exercises this option, some time may elapse between the user’s click on an item and the beginning of the transaction. If the user initially does not have enough Bits to exchange for a product, but then buys enough Bits, the Confirm button appears in the dialog after the purchase.
Note: Before confirmation, while the dialog UI is open, users are blocked from interacting with the Extension. Clicking anywhere outside the dialog causes the dialog to close and allows the user to interact with the Extension again. Also, users can cancel the flow at any point in the process.
When a user confirms a transaction, the Bits amount displayed in the dialog is locked in.
When processing is completed, a message is sent to your Extension front end through the onTransactionComplete() callback:
| If … | Then … |
|---|---|
| The product is configured in the catalog to broadcast to all users. | A message is sent to all instances of your Extension running on the channel where the Bits transaction was initiated. |
| The product is not configured to broadcast to all users. | A message is sent only to instances of your Extension running on the channel where the Bits transaction was initiated, and only to the specific user who initiated the transaction. |
If the Viewer is Not Logged In
If the viewer is not logged in when useBits is invoked, the UI indicates that login is required. If there is any other error (for example, if the user is banned or the SKU was removed from the catalog after products were loaded by the Extension front end), a generic error message is displayed to the user. This message disappears after 3 seconds.
For More Information
| For … | See … |
|---|---|
| Current information on Bits pricing | Cheer with Bits |
| Bits-related reference information | Extensions Reference |
| Information to familiarize yourself with Extensions, before using Bits-in-Extensions | Extensions documentation |
| Information on JSON Web Tokens (JWTs), including how to verify them | JSON Web Tokens |